
Here we are again on yet-another tutorial on using Serilog1 as your primary logging framework for both development as well as production.
If you look on the internet you’ll see there are many ways to integrate Serilog in your existing application. On this tutorial I’ll show you what I’ve been using for all the projects that I’ve handled.
You may ask what is the difference of my setup compared to others?

Programming isn’t about what you know; it’s about what you can figure out.
~ Chris Pine.
The setup I’ll show you allows the easy addition of new sinks and on the fly modification of the log format without the need to recompile your app again. That last part is the whole point: logging configuration becomes a deployment setting instead of a code change, which matters a lot when the production incident is already happening.
So how does that work?
Follow me and let’s dive into how to implement it. 👆
✅ Prerequisites
First of all, you must have a .NET 5.0 SDK (Software Development Kit) installed in your computer, and I also assume you are currently running Windows 10 or Linux with a proper environment set.
If you are on Windows 10 and already have a Visual Studio2 2019, just update it to the most recent version, that way would ensure your system has the latest .NET Core SDK3 version.
🛠️ So where do we start?
First, let’s create a test bed project. Type the command below on an existing shell console (e.g., bash, powershell, cmd, etc.):
dotnet new web -f net5.0 --no-https --name SerilogDemoThe command above will create a new project that will use the .NET 5 framework. And from the above flags, --no-https will set up the project to use a non-secured (non-SSL) empty web API (it means it will not generate a cert and an HTTPS URL), which keeps the demo free of certificate noise.
After the project creation, change directory to the project root. And install the following nuget dependencies:
dotnet add package Serilog
dotnet add package Serilog.AspNetCore
dotnet add package Serilog.Extensions.Hosting
dotnet add package Serilog.Extensions.Logging
dotnet add package Serilog.Settings.Configuration
dotnet add package Serilog.Sinks.Console
dotnet add package Serilog.Sinks.File
Then we will now dive into the C# implementation. First import the Serilog library on Program.cs:
using Serilog;After that, still on the Program.cs file, go to the method CreateHostBuilder and add or chain the UseSerilog method to our application startup:
webBuilder.UseStartup<Startup>().UseSerilog();The UseSerilog call will initialize the Serilog instance. Then we move to the Serilog hooks on our main thread. On the Main method, convert it first from void to int, the reason for this is to be able to return different numeric exit codes when an error happens.
Then we initialize the appsettings configuration early on; normally this will be initialized on startup. The reason we initialize this first is we will use the appsettings to provide configuration to the Serilog logger instance that will be called in this Main method:
IConfigurationRoot configuration = new ConfigurationBuilder()
    .SetBasePath(Directory.GetCurrentDirectory())
    .AddJsonFile(path: "appsettings.json", optional: false, reloadOnChange: true)
    .Build();
Next on, initialize the logger instance and handle further exceptions coming from the host builder creation. We’ll just use a generic Exception to catch all types of exception (this is not advisable specially in production environment; if ever, use a specific type of exception):
Log.Logger = new LoggerConfiguration()
    .ReadFrom.Configuration(configuration)
    .CreateLogger();

Log.Information("SerilogDemo Args: {a}", args);

try
{
    var host = CreateHostBuilder(args).Build();
    Log.Information("Starting serilog demo service");
    host.Run();
    return 0;
}
catch (Exception ex)
{
    Log.Fatal(ex, "SerilogDemo service terminated unexpectedly");
    return 1;
}
finally
{
    Log.CloseAndFlush();
}
When all changes are done, re-check all your code above. Check whether it’s the same setup; if all is fine we move to the appsettings.json, as that is our main key in this tutorial.
Here is the full Program.cs for reference:
using System;
using System.IO;
using Microsoft.AspNetCore.Hosting;
using Microsoft.Extensions.Configuration;
using Microsoft.Extensions.Hosting;
using Serilog;

namespace SerilogDemo
{
    public sealed class Program
    {
        public static int Main(string[] args)
        {
            IConfigurationRoot configuration = new ConfigurationBuilder()
                .SetBasePath(Directory.GetCurrentDirectory())
                .AddJsonFile(path: "appsettings.json", optional: false, reloadOnChange: true)
                .Build();

            Log.Logger = new LoggerConfiguration()
                .ReadFrom.Configuration(configuration)
                .CreateLogger();

            Log.Information("Token Validator Args: {a}", args);

            try
            {
                var host = CreateHostBuilder(args).Build();
                Log.Information("Starting token validator service");
                host.Run();
                return 0;
            }
            catch (Exception ex)
            {
                Log.Fatal(ex, "Token validator service terminated unexpectedly");
                return 1;
            }
            finally
            {
                Log.CloseAndFlush();
            }
        }

        public static IHostBuilder CreateHostBuilder(string[] args) =>
            Host.CreateDefaultBuilder(args)
                .ConfigureWebHostDefaults(webBuilder =>
                {
                    webBuilder.UseStartup<Startup>()
                        .UseSerilog();
                });
    }
}
On the appsettings.json, add the following JSON structure inside the root:
"Serilog": {
  "Using": [
    "Serilog.Sinks.Console",
    "Serilog.Sinks.File"
  ],
  "Enrich": [
    "FromLogContext",
    "WithMachineName",
    "WithThreadId"
  ],
  "WriteTo": [
    {
      "Name": "Console",
      "Args": {
        "outputTemplate": "[{Timestamp:HH:mm:ss} {Level}] {SourceContext}{NewLine}{Message:lj}{NewLine}{Exception}{NewLine}"
      }
    },
    {
      "Name": "File",
      "Args": {
        "path": "logs\\log_.txt",
        "rollingInterval": "Day"
      }
    }
  ]
}
Analyze the JSON structure: if you look carefully at the Using, it’s specified to use the Console and File. What this means is it will log on the console and to the specified log file.
Then on the Enrich key, it specifies what type of data needs to be added to the log and where to get it. The WriteTo key allows you to configure each sink (e.g., change the format of the log). Notice how the whole thing lives in JSON: that is exactly what allows you to change formats and sinks at deploy time without recompiling.
After that, we will now check if everything’s working fine by compiling it and running the program. If everything is okay, you should now see logs in your console, and a file will be created containing the previous logs:
dotnet runThat’s all basically. If you want to use Serilog on your controller, check below.
(OPTIONAL) CONTROLLER LOGGING
If you want to use Serilog on a controller or any class, then what you will do is import first the abstract logging class:
using Microsoft.Extensions.Logging;Then on the controller or class constructor, add the ILogger with the name of the current class. Below is the sample basic setup:
private readonly ILogger<InformHub> _logger;

public InformHub(ILogger<InformHub> logger)
{
    _logger = logger;
}

public async Task Command()
{
    _logger.LogInformation("Hello, World!");
}
To use the logger on a class, just call the logger instance and add a call to the method of the log verbosity you want. On the above we use LogInformation or INFO verbosity.
(ANOTHER OPTIONAL) IIS FILE PERMISSIONS
This is for IIS: if you ever want to use file logging, you may encounter that on the default setup it will not log to files. In order to log to files, first create the log directory (specified on the appsettings.json). Then change the folder’s ACL settings, adding the user IIS_USRS\<name-of-iis-site-name>.
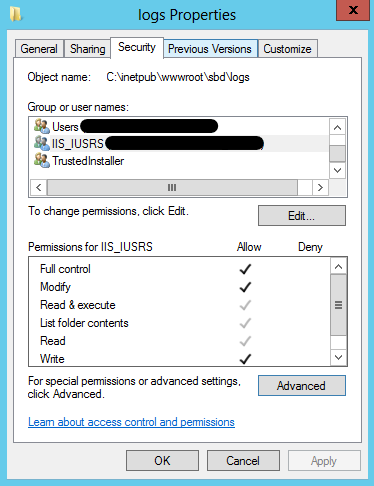
Fig. 1: Properties folder
Add Write access to the log folder for the user IIS_USRS\<name-of-iis-site-name>.
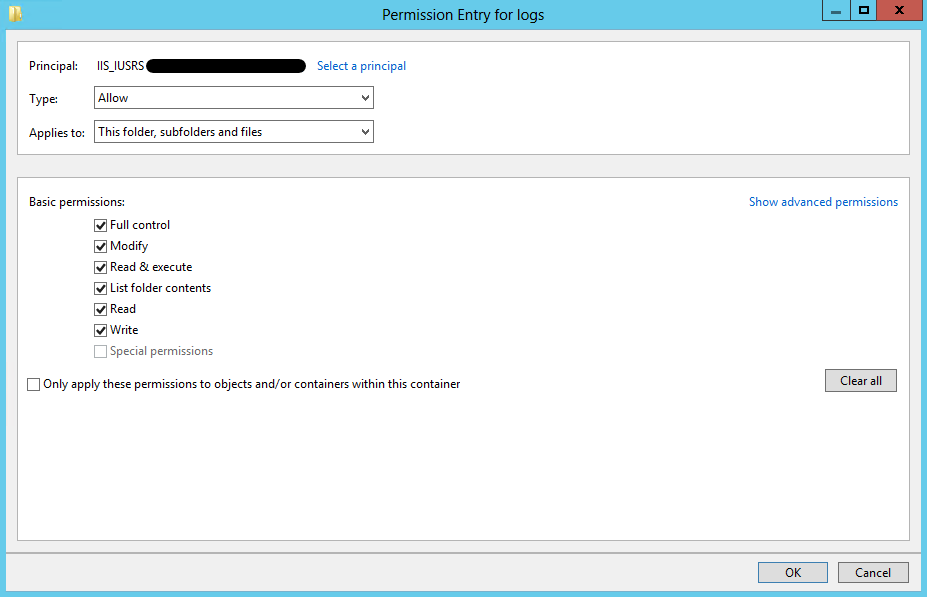
Fig. 2: Advance permission editing modal
Then just restart the site and check if everything is working. If it’s still not working, just redo it based on the above.
That’s all guys!
🧠 Final Thoughts
Logging is one of the most important things to do in development and production. Having no loggers in your web application is not advisable (with the exception of fully tested, high security applications); loggers can easily point out what exception and details occurred, and structured loggers like Serilog make the difference between “the app broke” and “the app broke at 14:32:07 in OrderService with these exact parameters”.
The config-driven approach in this tutorial means your operations team can change logging behavior without waiting for a deployment, and that is the real win. You can find the complete repository here.
Let me know in the comments if you have questions or queries, you can also DM me directly. Follow me for similar article, tips, and tricks ❤.
- Serilog is a diagnostic logging library for .NET applications. It is easy to set up, has a clean API, and runs on all recent .NET platforms. While it’s useful even in the simplest applications, Serilog’s support for structured logging shines when instrumenting complex, distributed, and asynchronous applications and systems. ↩︎
- Microsoft Visual Studio is an integrated development environment (IDE) from Microsoft. It is used to develop computer programs, as well as websites, web apps, web services and mobile apps. Visual Studio uses Microsoft software development platforms such as Windows API, Windows Forms, Windows Presentation Foundation, Windows Store and Microsoft Silverlight. It can produce both native code and managed code. ↩︎
- .NET (previously named .NET Core) is a free and open-source, managed computer software framework for Windows, Linux, and macOS operating systems. It is a cross-platform successor to .NET Framework. The project is primarily developed by Microsoft employees by way of the .NET Foundation, and released under the MIT License. ↩︎